Tuesday, April 30, 2013

Punctuation Marks!

We have lots of fun learning punctuation marks in our classroom.  I found a new favorite book.  Yes I did! 
It is perfect for Kindergarten.  My kids love it.  I should say, "MY KIDS LOVE IT!!!!!"
 
It makes a wonderful Writer's Workshop mini lesson, because my kids are having a ball writing punctuation stories! The Ellipsis, The Question Mark, and The Exclamation Point are favorites. 
 
One of my little girls wrote this Question Mark Book for me today, FULL of questions.  
 
Here is her sweet dedication.  <3
 
 
 She shared it, and I answered the questions in it.  Notice on her, "What will you be when you grow up?" page, the illustration with the question is  me as a doctor. hmmm. 


 When she read it, she said, "Maybe you could be a doctor... Or a horse. " hmmm.
So then, a little boy saved her and said, "She already IS grown up, and she is a teacher!" I didn't have to say a word. :)  This will be in my library right beside My Exclamation Point book forever. 
 

We also  play Four Corners with punctuation marks.  I have a bag full of different sentences that require different punctuation: statements, questions, lists of things that need commas, and excited sentences. The four corners of the room are labeled with a paper  that says Period., Question Mark?, Exclamation Point!, and Comma, .  It is played like all Four Corners games.  The children choose and run to a corner. I pull out a sentence and read it.  Whatever punctuation mark it needs, is the corner that has to go sit down.  Then, the rest of the class runs to a different corner, and we keep playing until there is one person left. 

My kids are very good at telling me the name and use of punctuation marks, and are having fun experimenting with using them in their writing.  I think that is wonderful at this stage.  We keep reviewing when to use each punctuation mark, and slowly, they are getting into the right places!

Often, the children just love to stick a period at the end of a line of writing, not a complete thought.  This activity really helps them to hear when a complete thought ends and when they naturally come to a stop when reading.   I made up a paper with sentences but no periods. I did this activity at a small group and it worked beautifully.  Everyone got a pack of Smarties and 6 of these awesome little stickers. 

I found these stickers at a Teacher Store, and they just look like a hand saying, "STOP!"  Perfect for a period!


I tried to write simple sentences that did not always end at the end of the line, but sometimes in the middle of a line, so they could hear when a sentence ended and not just stick a period at the end of the page.  Learning that a sentence is a complete thought- and that a sentence does not always just end at the end of the page- is the trickiest thing about learning to use a period.  (Well, that and remembering to actually USE one! :) 
 
I have also used Fruit Loops for this activity, but Smarties seemed perfect.  Of course they need to eat one before they begin for Smartie Power!  Then, after we put on the Smarties, we read the sentences together and clap at each period (Smartie).  Next, the child can eat the Smartie and replace it with a sticker. 
 
Since they each got six stickers and only needed five periods, I dictated a sentence on the back so they could end that with their final sticker.  One group only wrote one dictated sentence, but for the others, I dictated a statement, a question, and one that needed an exclamation point.
 
 
Here is my  Kindergarten Writing Prezi.  I have this up on my Smartboard everyday during Writer's Workshop.  It is great for a quick reminder, mini lesson, or just to pull up a chart to talk about with the children to get us in the mood for doing our best writing! I also included links to lined paper that we put up on the Smartboard sometimes to practice forming letters, as well as links to Common Core Ideas for Teachers!
 
 
Thank you for visiting!
Happy Teaching,
Carolyn


Monday, April 29, 2013

Mother's Day!

We have started making some Mother's Day treasures in our room. I am extra lucky in my classroom, because my own mother comes in every day to work with children for an hour during our Literacy Center time.  What a blessing!  The only problem is that everyone wants to work with her and there isn't enough of her to go around.  She can do so much RTI with the children one on one, or in small groups- and they just think they are having fun...  Win- win! Thank you, mom!  <3 
 
Now- for the gifts! :)

First, I tried the picture of the child holding a flower for the card that I saw on Pinterest.  I loved the idea.  I had them laminated so they would last longer. I am not sure if this was a good idea or not.  The paper may lay better with the flower poked through if it weren't laminated.  I am happy the way they came out, though!
 
My kids love making and giving lots of little treasures, so I decided we would make mom a little treasure bag.  I just had the children decorate a white lunch bag anyway they would like.  Now, whenever we complete something, I just put it right in the bag so it will be all set for the moms!

One simple treasure is a bracelet with beads.  This can be totally independent, is easy , and the children really feel like they created a  special piece of jewelry when they are finished.  I helped twist and form the bracelet after the beads were on. 
 
Another fun treasure is our origami bookmark.  My children love their bookmarks.  We did this activity together at a small group center. I explained that origami was Japanese paper folding and we talked a little about where Japan was, just so the children had an idea. I  had them follow the steps with me.  The only really tricky one for some of them is the last step.   The first step (choosing the most beautiful paper for your mom) helps them feel like it is going to be an easy  activity to follow! When things got tricky, one of my little guys said, "One really important part of origami is that you never give up!"  I couldn't have said it better. :)

Here are pictures of the steps:
1. I tell the children to put the paper in front of them in a diamond shape with the white side up and pretty side down.  Then, take the bottom point and match that to the top point, and fold in the middle so it is a triangle.
 
2.  Next, we take the lower right corner and fold that up to the top point.  It helps if they put a finger in the middle of the bottom of the triangle, so they only fold to that point.
3.  Do the same fold on the other corner. Make a smaller diamond.
4.  Now, open up the folds, back to the bigger triangle. Have them notice that there are two layers.  Fold the top layer back down to the bottom middle of the triangle like this:

5. This is the tricky part for some of them.  Take the lower right corner and tuck it up and behind the middle part that is folded down to create a pocket.
 
6. Do the same on the other side.
 
7.  Ta-da! This is the bookmark!
 
Here is a quick little Youtube tutorial that may be easier to follow.  :)  That is how I learned it originally:
(Except she puts the bookmark in the book the opposite way that I do. I have the triangle facing the page I am marking.)
  
You can also make them into monsters  by adding eyes and teeth, or googly eyes.  :) There are lots of ideas for that, too, like this:
 
Here is an awesome site I just found.  We are going to try the Origami Heart bookmark.  (I found it under the "Useful Origami" heading.)  This site gives great step by step tutorials.  My kids loved making origami, so I think we can work that into lots of fun things we do.
 
My kids were very focused!  Once I showed them how to tuck in one corner, most of them got it. It was hard for some of them, but we did it together.


I had them write a little tiny note to mom on the bookmark with colored pencils.

Those are a few treasures so far.  Thank you for visiting! 
Happy Teaching,
Carolyn

PS  Our lupines are growing!  :)


Friday, April 26, 2013

Teaching the Moving Child

We had a very informative class the other day with our OT, discussing the book Teaching the Moving Child by Sybil M. Berkey. 


She shared some great new ideas that I am going to try in my classroom, and other ideas that I have heard, but sometimes forget to use.  Here are some of my favorites:

1. Use golf pencils or broken crayons to help children use correct finger grip.
Broken crayons kind of make me cringe. :)  I could have named my blog "Sharp Pencils and Brand New Crayons,"  because those are two things I LOVE.  OK- even more honestly, it could have been named "Sharp Ticonderoga Pencils and Brand New Crayola Crayons." But that would never fit on a button. :)

 However, cringing aside,  I do see the benefit of using these smaller writing tools for children who need help or reminders using the correct grip.  If a crayon or pencil is small, children can't get all of their fingers around it, and therefore are "forced" to use a correct grip.  This is an especially good tip to remember at the beginning of the year.

I don't have any golf pencils now, but here is a picture of my husband and son on a typical weekend, so I don't think I should have too many problems collecting some this summer! 

2.  Have children write in a prone position (lying on the floor with a clipboard) or standing and writing on a wall space to put their wrists in proper position.


I tried this one and you can see it does position the child's arm and wrist correctly.  I do have a couple children who have "floppy wrists" or who bend their wrists around when they write.  Lying on the floor makes them rest on their forearm and keep their wrist in the right position.  This isn't practical all the time, but I could definitely have them do this more during center times or certain writing times.  I didn't like the wall writing as much probably because I don't have much wall space and the paper has to be at the perfect height for them so they aren't reaching up  or stooping down, which defeats the purpose. 


3. Have over-active children do "chair push-ups" or push against a wall to remain calm and more focused.
 
   
We do like a good "Chair Push-Up" break now and then!  My whole class does this together. I have a couple children who benefit from this the most, but it is fun and helpful for everyone- as well as a challenge! They love to see who can stay up for a long time.
 
We have a ball with the Wall Push.   I don't have much wall space, but we all line up quietly and walk around the corner in our hall, where there are no classrooms.  We try to push the wall as hard as we can.  I tell them we are trying to make Miss Quick's classroom smaller by pushing in the wall!   They really think we have moved that concrete wall over.  Sorry, Miss Quick, for your shrinking room! :)
 
Again,  this is a great "brain break" for everyone in the class!  Who doesn't feel like pushing a wall every now and then? One good thing about doing this in the hall is that I tell them we have push really hard, but be quiet, so they aren't screaming- but putting the effort into the physical exertion.
 
We had so much fun with this yesterday.  We had a "picky" little week. I think we have had too much togetherness and just got a little cranky with each other, as any "family" does.   I read Mean Soup (another FAVORITE!).

 The story is about a boy who had a very frustrating day. His mother suggests that they make soup together, which he does not want to do at first.  She boils water on the stove, adds a little salt,  and screams into the water.  Then, she has him do it. They both scream louder into the "soup" until they feel better.  After that, the mother decides they should stick their tongues out twenty times into the soup- which, we, of course, did as well. (I actually made tally marks each time we stuck out our tongues-  MATH!)  What a fun idea to get out some frustration! We also took out our frustrations on the wall.  Again, sorry, Miss Quick! :)  We are SURE your room is at least a foot smaller by now. 
                                        
I make it sound like my class was a bundle of FRUSTRATION- but actually, they are fabulous! We just had lots of fun trying out some great techniques to relieve stress.  We all felt better. :)  
  
Other good suggestions for an overly-active child were to have him/her do more physical jobs for you in the classroom, like wipe down tables, push in chairs, or carry heavy objects ( like a small stack of books) for you in the hallway.  Kids love to be helpers, and this is a way for a child to be a helper and have some physical stimulation. 
(ok... maybe just a small stack!)
 
I found some more great songs on Youtube for our Shake Breaks.  Here is the Children's Zumba Dance from The Learning Station:   LOTS of fun!
                                    
We also danced to Going on a Bear Hunt and  this one- Hold Still by Just Dance Kids.


I added these to my Get Up and Move Prezi.  I put all of my favorite Shake Breaks together in a Prezi so they will all be right there for any quick minutes we need one!  Sometimes I want one FAST- and I don't want to search  for it.  This way, I have them ready to go! My    Get Up and Move Prezi  is available at my TPT store.
Thank you for visiting! 
Happy Teaching,
Carolyn


Tuesday, April 23, 2013

The Jolly Postman

We had so much fun writing in my classroom this afternoon, we could still be there writing now!  How do I NOT own the book, The Jolly Postman
 
 
My fabulous friend Amy, across the hall, lent me this book.  I knew right away what we would be doing for Writer's Workshop for the rest of the week.  I am sure everyone has seen this book (but me- I must have been living in a hole!  I thought I had seen every single kids' book out there!).  Here is a synopsis from Amazon in case you aren't familiar with the story:
 
The Jolly Postman goes from home to home in a fairy-tale kingdom, delivering letters to such familiar addresses as "Mr. and Mrs. Bear, Three Bears Cottage, The Woods." Every other page is an actual envelope, with a letter tucked inside. The letter to the three bears, for instance, is from Goldilocks, who apologizes for the trouble she's caused and invites Baby Bear to her birthday party. Some authors would stop with this cute concept, but the Ahlbergs have given this book their all. The story of the postman's travels is told in charming verse; the pictures are delightful, full of clever detail; and the results are frequently hilarious. (The wicked witch of "Hansel and Gretel" fame, for instance, receives a circular from Hobgoblin Supplies Ltd. which advertises such appealing products as Little Boy Pie Mix.)
 
The children loved the story, but most of all, they were taken with  the envelopes and real letters tucked inside.  I did condense the story a bit, because some of it was a little wordy for my kids- and in one part someone gives the postman champagne which I left out, too... :)  but the book is just a clever, charming idea.
 
Reading this story was my entire mini lesson- no need for anything else but this on each table (along with scissors to cut tiny note size papers for the envelopes and glue sticks to stick on envelopes):
  
and LOTS of this:

The children were so busy and so focused, I didn't even interfere today. I just let them go so they could get their ideas down and create.


There will be plenty of time for conferencing all week to tweak this and that, but today was amazing: quiet, busy, joyful, creative, messy, and productive!  Perfect! Today I just listened to enthusiastic ideas and watched the magic! :)

Here are some of the works-in-progress:

This boy loves Nerf Guns!  I love how many of the children used a tiny note in an envelope for the dedication.  He added a mini book called "Nerf Guns With My Dad." This may need to be saved for a Father's Day present...


She LOVES punctuation marks almost as much as I do. :)


 ("It's always line, dot - and 'and, and, and' " ( for the ellipsis below)


(An exclamation point was her surprise in the envelope!)

Kayla is going to make this and leave it in her mailbox at home for her real mailman! :) 


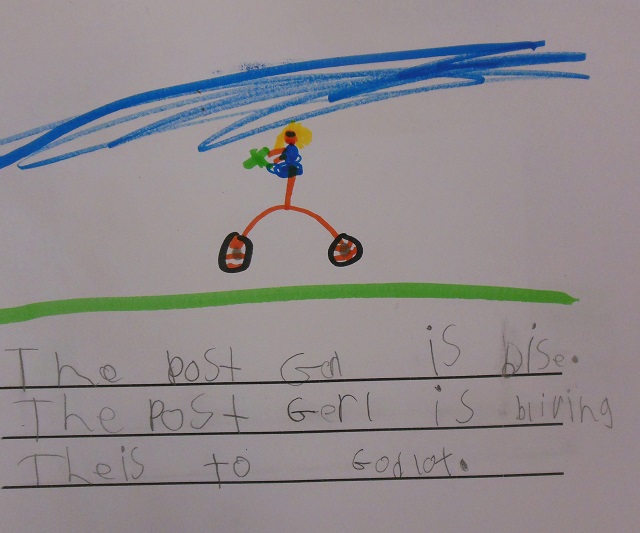
Shannon got very busy right away, making a story similar to The Jolly Postman, but calling it  The Busy Post Girl. She even made a cut-out  Post Girl that we can use to retell her story in class!
 
 
("To Goldilocks,  You should tell the bears you are sorry for what you did.  Love, The Post Girl")
 
I'm sure tomorrow I will get to see what this next letter says!  That post girl is busy on her bike!
 
our "prop" for retelling the story
 
These are just some fun samples from day one. I can't wait to see what tomorrow will bring!
 
You can check out   my Kindergarten Writing Prezi at my TPT Store. I have this up on my Smartboard every day during Writer's Workshop. It is great for quick reminders or lessons along the way!
 
 
Thank you for visiting and sharing my Jolly day!  :) 
Happy Teaching,
Carolyn


Search This Blog